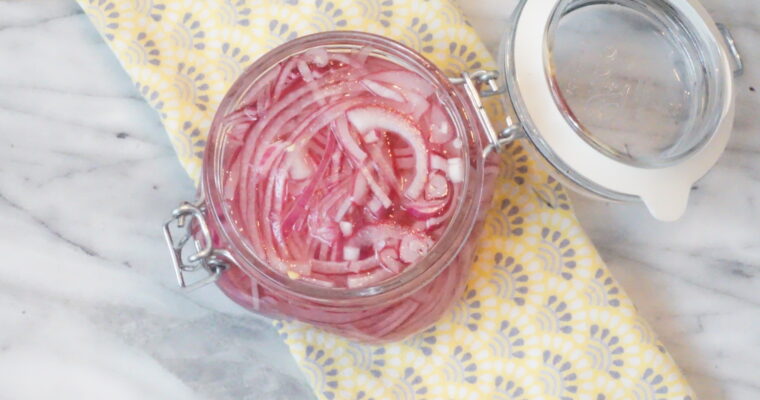
Category: Recipes

Pickled Red Onions

Pickled Red Onions

For years I’ve been enjoying Pickled Red Onions on various dishes in multiple restaurants and absolutely loved the flavor they added. About six months ago I finally started making my own Pickled Red Onions and they did not disappoint. With 5 ingredients and less than Continue Reading

Classic Deviled Eggs

Classic Deviled Eggs

I made my first Classic Deviled Eggs about six years ago on the first Thanksgiving we celebrated in Georgia. I had no idea how to make such a thing! I just knew that it was a family favorite, especially for my brother-in-law, and Thanksgiving wouldn’t Continue Reading

Summer Fresh Vegetable Orzo Pasta

Summer Fresh Vegetable Orzo Pasta

Summertime food means a few specific things to me: easy, fresh, and you want to keep coming back for more. I get my inspiration for the food I create from all different places; Summer Fresh Vegetable Orzo Pasta was one hundred percent inspired by my friend Vern and his garden. Vern’s garden is a 10-ish foot plot of joy right out in the front of his house that’s brimming with veggie goodness – tomatoes, zucchini, peppers, and more!

When working with fresh, simple ingredients my goal is to always enhance their individual flavors. Summer Fresh Vegetable Orzo Pasta does just that. Roasting the tomatoes brings out their sweetness causing them to release their juices contributing all that natural goodness to the sauce. Sauteeing the corn and zucchini in olive oil gives them a chance to wake up and get slightly caramelized creating a bit of crunch on the edges and a slightly nutty flavor. The sweetness from the creamer and fruitiness of the white wine tie it all together to make the perfect, light, and yummy pasta. 

This Summer Fresh Vegetable Orzo Pasta is flexible, extremely family-friendly, and is a great dish to bring to a neighborhood party. Summer Fresh Vegetable Orzo Pasta can be served at room temperature alongside a grilled burger, chicken, or fish. It also makes a great on-the-lighter side main course served up in a heaping portion in a large pasta bowl and a side of crunchy artisan bread

If you’ve got friends with a garden, go ahead and put in your veggie order now. If you don’t, I suggest you find one, because this Summer Fresh Vegetable Orzo Pasta deserves the best of the best.

How to Prepare Summer Fresh Vegetable Orzo Pasta

This recipe calls for preparing many of the ingredients in an asynchronous manner then pulling them all together in one pot at the end. 

First roast the tomatoes by adding them to a cast-iron skillet or sheet tray with olive oil, salt, and pepper. Roast them in a 425 degrees oven for about 15 minutes (up to 20). When you pull them out they’ll be slightly wrinkly and very juicy. 

Meanwhile, cook your orzo pasta to al dente in a pot of salted boiling water. 

Next, heat a heavy-bottomed pot (such as a dutch oven) over medium heat with olive oil and butter. Sautee the corn until it turns bright yellow and gets slightly crispy on the edges. Add the zucchini and sautee until it’s just cooked through and starting to caramelize. 

Finally add in the roasted tomatoes, wine, creamer, herbs, and remaining butter and stir it all up to combine into a perfect sauce. Add the cooked, al dente pasta and stir to combine. Garnish with some roughly chopped parsley and you’re ready to eat! 

Summer Fresh Vegetable Orzo Pasta

Prep Time15 minutes
Cook Time30 minutes
Total Time45 minutes
Servings: 6

Ingredients

  • 1 Box Orzo Pasta
  • 2 tbsp Basil, chopped Reserve a pinch for garnish right before serving.
  • 2 tbsp Parsley, chopped Reserve a pinch for garnish right before serving.
  • 2 tbsp Thyme, chopped Reserve a pinch for garnish right before serving.
  • 3 Cups Tomatoes, cut in half lenghtwise You don't need to be exact with the tomatoes! Use 2 - 3 cups or 1 to 2 pints of cherry or grape tomatoes.
  • 2 Zucchini is quartered lengthwise and chopped into slices about 1/4 inch thick. I use two pretty large zucchini from the garden. If you only have smaller zucchini, use three.
  • 5 Ears of sweet corn, kernels removed.
  • 1/2 C Almond Milk Creamer If you are not dairy-free, substitute with half and half.
  • 1 C White Wine
  • 1 tsp Red Pepper Flakes
  • 2 tsp Garlic, chopped Divided
  • 1 Lemon, zested, and cut into quarters.
  • 4 tsp Butter
  • 4 tsp Olive Oil
  • 1 C Parmesan Cheese, grated Optional
  • 1 1/2 tsp Salt Approximate, Divided
  • 1 1/2 tsp Pepper Approximate, Divided

Instructions

  • Heat your oven to 425 degrees.
  • Bring a large pot of water to a boil. This will take 8 - 10 minutes. Once boiling add a very generous pinch of salt and cook the orzo to al dente.
  • In a medium-sized cast-iron skillet or sheet tray, toss your tomatoes with 1 tsp olive oil and the garlic, and 1/2 tsp salt and pepper. Roast in the oven for 15 - 20 minutes, until the tomatoes start to release their juices.
  • While your tomatoes are roasting, heat the remaining olive oil, garlic, and 2 tbsp butter in a heavy-bottomed, deep pot (like a dutch oven). Add the corn and cook until bright yellow and slightly crisp on the edges. Season 1/2 tsp salt and pepper. This process will take about 10 minutes. 
  • Now, add in the zucchini with an additional pinch of salt and pepper. Let the zucchini cook for about 3 minutes just until it starts to soften (you do not want mushy zucchini).
  • Add in the white wine, remaining butter, herbs, crushed red pepper, and lemon zest. Season with a pinch each of salt and pepper and bring up to a bubble. While the sauce is bubbling, remove the tomatoes from the oven, adding them (plus their juices) to the pot. Allow this to combine and reduce for 5 - 8 minutes, stirring occasionally.
  • Add the al-dente orzo to the sauce with the creamer and parmesan cheese (if you are using it). Stir to combine. Reduce the heat to medium-low and allow the sauce to thicken for 5 - 8 minutes. Taste and season accordingly with salt and pepper.
  • Once thickened and ready to serve, garnish with the remaining herbs and lemon wedges.

Recipe Tips

As a side dish: Serve this pasta in a generous portion alongside a grilled burger, chicken, or fish. 
As the main course: Serve in heaping piles in large pasta bowls with a side of artisan bread.
Best Ever Cowboy Caviar

Best Ever Cowboy Caviar

Cowboy Caviar is the side dish of legends. It’s the must-have for our annual Witt Family Vacation. It’s a party side dish (or appetizer) that pleases everyone. It’s the dish people talk about in hushed, reverent tones at the neighborhood potluck. Cowboy Caviar offers a Continue Reading

Bacon-Roasted Fingerling Potatoes

Bacon-Roasted Fingerling Potatoes

Growing up, potatoes were a staple in our house. I can remember a giant 10-pound bag of Russet potatoes always in our pantry right next to the 10-pound bag of yellow onions. The potatoes were served up in various styles – mashed, baked, or pan-fried Continue Reading

Blackened Shrimp Tacos with Spicy Refried Black Beans

Blackened Shrimp Tacos with Spicy Refried Black Beans

On May 5th (Cinco de Mayo) I announced to my husband that I had a great idea for Shrimp Tacos and I was planning to make them tomorrow (on May 6th). He sweetly, but also with some confusion replied, “So you’re going to make tacos the day after Cinco de Mayo?” 

In an effort to get back on track with our Cinco de Mayo celebrations and actually do some celebrating on May 5th, we decided we’d get to-go margaritas from our  local Mexican restaurant in our neighborhood. We put three-month-old Hudson in the stroller for our walk and headed toward the Mexican restaurant. Upon approaching, the restaurant was so busy with people flooding out in the street and too packed to even get in the door, so we ended up with a beer and a glass of wine to go from a slightly upscale steakhouse also in our neighborhood. Fate was not interested in the Atkinson’s celebrating Cinco de Mayo on May 5th… next year we’ll to plan better for Cinco de Mayo!

Regardless, I’m pleased to inform you that the May 6th Shrimp Tacos were delicious and the Spicy Refried Black Beans were the perfect accompaniment. I’m not really bean person with my tacos. I’m the person that orders “n0 beans, double rice,” you know? Let me tell you that in between bites of my tacos I signing praises for the Spicy Refried Black Beans. They were beyond good, so make sure you give them a try. 

I served up our tacos topped with charred sweet corn, diced white onion, and a side of cilantro-lime rice. They were a perfect ode to Cinco de Mayo a little late and definitely something that will reappear on the menu… especially those beans! 

Blackened Shrimp Tacos with Spicy Refried Black Beans

Prep Time15 minutes
Cook Time15 minutes
Total Time30 minutes
Course: Main Course
Servings: 4

Ingredients

  • 1 1/2 Pounds Shrimp, Peeled and Deveined Large, 26 Count
  • 1 Tbsp Blackened Seasoning
  • 1 Tsp Chili Powder
  • 1 Tsp Cumin
  • 1/4 Tsp Cayenne Pepper
  • 2 Cans Black Beans
  • 2 Tbsp Chipotle in Adobo, Finely Diced
  • 1/2 Cup White Onion, Finely Diced
  • 2 Tbsp Garlic, Finely Diced
  • 3/4 Salt, Divided to Taste This is an approximate measurement; you may use more or less depending on your preference and taste.
  • 3/4 Tsp Black Pepper, Divided to Taste This is an approximate measurement; you may use more or less depending on your preference and taste.
  • 1 C Chicken Stock
  • 2 Tbsp Vegetable Oil
  • 1 Tbsp Butter
  • 2 Ears Sweet Corn
  • 8 Tortillas Soft corn or flour tortillas, based on your preference.

Instructions

Prepare the Shrimp

  • Peel and devein the shrimp by running a paring knife down the spine of the shrimp. Using the tip of the knife, pull out the dark blue vein of the shrimp, then peel off the shell. (Tip: You can ask your fishmonger to do this step for you. Or, look for already peeled and deveined shrimp.)
  • Next, remove the tails from the shrimp by pinching lightly at the top of the tail, then pulling straight off. (Note: You can also cut the tails off with a knife, but you will lose some of the meat from the shrimp.)
  • Pat the shrimp dry utilizing a paper towel or kitchen towel. Chop into bite-sized pieces about one inch wide.
  • Make the dry rub for the shrimp by combining the blackened seasoning, chili powder, cumin, and cayenne pepper in a medium-sized mixing bowl.
  • Add the shrimp to the mixing bowl with the spice rub; mix gently and thoroughly until each shrimp is coated.
  • Set this aside in the refrigerator for at least one hour; up to four hours.

Prepare & Cook the Corn

  • Cut the kernels off the cobs of corn by running a sharp knife down each edge. To avoid losing any corn kernels, place the ear of corn flat on a cutting board cutting towards the board as opposed to cutting from top to bottom.
  • Heat a skillet over medium-high heat. To the skillet add 1 tbsp butter. Once the butter is melted add the corn and season with salt and pepper.
  • Cook the corn on medium-high heat stirring occasionally for 5 - 7 minutes until slightly crispy on the outside and cooked through.
  • Set it aside for assembling the tacos.

Spicy Refried Black Beans

  • Drain and rinse the black beans in a colander with cool water. Set them aside over a kitchen towel to allow the remaining water to drain off.
  • Add the 1 tbsp vegetable oil to a non-stick skillet set at medium heat.
  • To the oil, add the onion and season with salt and pepper. Cook for 3 - 5 minutes until the onion is slightly translucent and tender.
  • Add the garlic and Chipotle in Adobo; season with salt and pepper. Cook for 3 - 5 minutes until the mixture becomes very fragrant.
  • Add the black beans and chicken stock; season with salt and pepper. Stir well to combine and bring the mixture to a simmer. When the mixture begins to simmer, cook for 5 - 7 minutes allowing the beans to soften.
  • Once the beans have softened, utilizing a potato masher or the back of a wooden spoon, mash the beans until a paste has formed. This will take a few minutes.
  • When the paste is formed, cook another 2 - 3 minutes, then turn off the heat and set aside for assembling the tacos.

Cook the Shrimp

  • While the black beans are simmering, add 1 tbsp vegetable oil to a cast-iron skillet over medium-high heat. Allow the pan to become hot (about 2 minutes).
  • Once the skillet is hot and the vegetable oil is shimmering, add the blackened-seasoned shrimp.
  • Cook the shrimp for 3 - 5 minutes, minimally stirring so the seasoning caramelizes, enhancing the flavor.
  • Once the shrimp become a slightly pink color, they are cooked through. Turn the skillet off, remove it from the heat, and set it aside.

Prepare the Tortillas

  • While the beans finish cooking, char the tortillas by placing them over an open flame for 30 seconds on each side.
  • Set them aside in a clean kitchen towel so they remain soft.

Assemble the Tacos

  • In the bottom charred tortilla, spread a heaping spoonful of the Spicy Refried Black Beans, then add two to hree spoonfuls of the Blackened Shrimp.
  • Top the tacos with the crispy, charred sweet corn.

Recipe Tips

Serve two to three tacos per person with a side of your favorite Mexican-style rice. 
Additional toppings for the Blackened Shrimp Tacos with Spicy Refried Black beans include: Avocado slices, diced white onion, and cilantro.
Classic Chicken Salad

Classic Chicken Salad

I don’t know how it is in your house, but in our house, chicken salad is beloved and Classic Chicken Salad is our go-to recipe. Classic Chicken Salad works great for our family. My husband turns it into a sandwich and I love to eat Continue Reading

Fried Egg BLT

Fried Egg BLT

This Fried Egg BLT combines one of my all-time favorite foods – bacon – with one of my must-have comfort foods – over-easy style fried eggs. These two things come together in sandwich form with juicy, ripe tomatoes and crunchy romaine lettuce to form what Continue Reading

Sweet and Savory Pinwheels

Sweet and Savory Pinwheels

Sweet and Savory Pinwheels were inspired by two things: our pandemic quarantine pantry/refrigerator stock and my sister-in-law asking if we wanted to split sides for Easter lunch all the way back in 2020. I had been on a bit of a bread kick so flour and yeast were ample. I had also been stocking up with various sauces to help my husband and I put together a quick meal while our son was napping.

Sweet and Savory pinwheels are layered with cinnamon sugar (think cinnamon roll), pesto and sweet onion, and bacon jam with shredded cheddar cheese.

One thing you should know about me is that I don’t believe in always starting from scratch and firmly believe in adapting things based on what works for you. This is true for me in cooking, but also in all other aspects of my life, even work. Is there a shortcut available that’s great quality and will reduce the time it will take me? Count me in!

In this case, that’s true of the dough for Sweet and Savory Pinwheels. I adapted two recipes – one from Half Baked Harvest and the other from Two Peas and Their Pod. This combination works great for me every time and makes 24 Sweet and Savory Pinwheels in total (8 of each flavor).

Sweet and Savory Pinwheels do take some time but it’s time well spent! These beautiful, sweet, savory, and very delicious pinwheels are a perfect appetizer or accompaniment to any meal, especially one for the Holidays.

Prepare the Sweet and Savory Pinwheel Dough

Making bread dough of any kind is generally accompanied by some technical baking terms. To prepare the Sweet and Savory Pinwheel Dough, start by blooming the yeast. This process essentially activates the yeast, ensuring it will help the dough rise. To bloom the yeast, combine the yeast, 1 tsp of sugar, and warm water in a small bowl. Stir the mixture gently and let it sit for 5 – 10 minutes until it starts to bubble and is slightly fragrant.

Next, fit your stand mixer with the beater blade (the one that looks like a whisk). Combine the butter, sugar (1 cup), salt, and hot water on a high speed until it forms a homogeneous, smooth mixture. Once combined turn off your mixer and let it cool off a bit, about 5 minutes.

To the cooled (think warm-ish) butter/sugar/salt/hot water mixture, add two cups of flour and combine on medium heat (so the flour doesn’t splatter everywhere) until very smooth.

Add the bloomed yeast and mix well. Add the two eggs (pre-beaten) and combine fully.

At this point, you’re halfway through the process! Remove the beater blade from the stand mixer and switch it out with the dough hook.

With the stand mixer on low speed, add in the remaining flour allowing the dough to combine as you go. This can get messy if the mixer is on too high of a speed. I generally use speed four on my KitchenAid stand mixer. Keep going until you’ve added a total of 8 cups of four.

Evaluate the Sweet and Savory Pinwheel Dough

Bread dough sends its own messages and typically when bread dough is ready it will start to pull away from the sides of the bowl. After 8 cups of four have been added, turn the mixer off and evaluate the dough. If the dough is still super sticky and not coming off the sides, continue to add flour up to 10 cups until it starts to pull away from the edges. If the dough is a little sticky and starting to pull away from the sides, add another cup (a total of 9) of flour. Go easy with adding additional flour and monitor the stickiness and the message your dough is sending as you go!

Knead and Rest the Sweet and Savory Pinwheel Dough

Once the flour is fully combined, allow the dough hook to knead your dough for 3 – 5 minutes. This helps to form the glutens in the dough.

After 3 – 5 minutes flour a clean work surface (a large cutting board, a countertop, etc.) and turn out the dough.

Knead the dough by hand until it’s very smooth, sprinkling additional flour as needed so your hands don’t stick to the dough. This process takes about 3 minutes and is a bit of an arm workout!

Place the kneaded dough in a clean bowl, cover it tightly with plastic wrap, and place it in a warm spot to rise. My favorite place to let dough rise is in the oven (not turned on). It’s not likely to be disturbed and is temperature regulated. Let the dough rise for one hour (up to two); it will double in size.

Make the Sweet and Savory Pinwheel Fillings & Icing

I recommend making the fillings and icing while the dough is rising. That way, you’ll be ready to go and knock out the remaining steps.

Cinnamon Roll Filling

Combine the cinnamon, brown sugar, granulated sugar, and salt, and mix well. Use approximately three-fourths of the mixture for the filling of the cinnamon rolls and reserve the remaining for sprinkling on top.

Cinnamon Roll Icing

Combine the powdered sugar and water in a bowl and mix well. If you feel it’s too loose, add a bit more powdered sugar, 1 Tbsp at a time. If it’s too thick, add a bit more water, ½ tsp at a time. The goal is to have an easily pourable icing so it gets into the nooks and crannies of your cinnamon roll pinwheel.

Pesto and Sweet Onion

Heat a medium-sized skillet over medium heat; saute the onion and garlic in olive oil and season well with salt and pepper. Saute the onion and garlic mixture until the onion is slightly translucent and the garlic is very fragrant. This will take about five minutes.

While the onion and garlic are sauteing, combine the pesto, lemon juice, salt, pepper, red pepper flakes, and olive oil in a bowl. Stir well to combine and set aside.

Once the onion and garlic mixture has finished cooking and cooled slightly (think warm-ish), add them to the pesto mixture, stir well to combine, and set it aside.

When ready, you’ll spread all of this filling inside the Sweet and Savory Pinwheel dough.

Bacon Jam & Cheddar

If using store-bought bacon jam, bring it to room temperature along with the 8 ounces of shredded sharp cheddar cheese (or other favorite shredded cheese).

As an alternative to bacon jam, you can prepare a half-pound (about 6 – 8 slices) in a non-stick skillet over medium heat. Add 2 tablespoons of brown sugar and ½ teaspoons cayenne pepper while the bacon is cooking. Once the bacon is cooked to your desired doneness (I like my bacon on the chewy side, you might like yours more crispy), dice it up and set it aside.

For the Sweet and Savory Pinwheels, you’ll dollop scoops of the bacon jam (or diced bacon) all over the pinwheel dough, then layer the shredded sharp cheddar cheese on top. There is no exact science to this method – just go for it!

Form the Sweet and Savory Pinwheels

After the Sweet and Savory Pinwheel dough has risen, turn it out on a clean surface (a large cutting board, a countertop, etc.) dusted with flour.

Divide the dough into three even parts (you might not be exact and that will be ok!) and pre-heat the oven to 375 degrees.

Roll each third of the dough into a large rectangle approximately 10 inches wide by 14 inches long.
Using a basting brush or spoon, evenly spread melted butter over the dough, just enough to cover it and give the filling something to stick to. Add the filling (Cinnamon Roll, Sweet Onion and Pesto, or Bacon Jam and Cheddar). With the filling in place, roll your dough all the way to the end creating one log of deliciousness. Roll as tightly as possible. Again, no exact science, just go with it – you’ll do great!

Cut the Sweet and Savory Pinwheel log into approximately 8 slices, making them as close to the same size as possible. To do this, I recommend starting by slicing in the middle, then cutting each half in half, and so on.

Place the sliced Sweet and Savory Pinwheels into a baking dish relatively close together. In my opinion, it’s absolutely fine for them to touch, depending on the size of your dish. I use several pie and cake pans and about a ½ inch gap between each pinwheel. Let them sit like this for another 30 minutes. They’ll rise ever so slightly again.

Repeat this process until you’ve made each flavor profile.

Baking and Final Touches for the Sweet and Savory Pinwheels

Each flavor profile has its own pre-baking finishing touch. For the cinnamon rolls, dust the top with the remaining filling mixture. For the pesto and sweet onion pinwheels, sprinkle salt and pepper and parmesan cheese (if using). For bacon jam and cheddar, sprinkle the top with salt and pepper.

Bake the Sweet and Savory Pinwheels for 30 – 35 minutes or until golden brown. Once removed from the oven, allow them to cool and set in the baking dishes for approximately 5 minutes.

Serve the Sweet Onion and Pesto and Bacon Jam and Cheddar Pinwheels as is. For the Cinnamon rolls, pour over the icing and (ideally) serve warm.

This recipe was a brainchild of mine and one that went right, folks! They turned out amazing and almost too stunning to eat. I’m thrilled to be sharing this with you and I hope you’ll share your oh-so-impressive pinwheels with good friends and family, too.

Savory and Sweet Pinwheels

Prep Time30 minutes
Cook Time35 minutes
Rising Time1 hour 30 minutes
Total Time2 hours 35 minutes
Course: Breakfast, Side Dish
Servings: 24 Pinwheels

Ingredients

Pinwheel Dough

  • 2 Packets Active Dry Yeast
  • 1 C Warm Water The water should be warm to the touch; not hot.
  • 2 C Hot Water The water should be boiling.
  • 1 C Sugar Plus 1 Tsp
  • 10 C All Purpose Flour Plus extra for rolling out the dough; approximate 2 Tbsp
  • 2 Eggs Size Large
  • 1 Tbsp Salt
  • 1/2 C Butter

Cinnamon Sugar Filling

  • 3 Tbsp Cinnamon
  • 1/2 C Brown Sugar
  • 1/2 C Sugar
  • 1/2 Tsp Salt

Pinwheel Icing (For Cinnamon Sugar Layered Pinwheel)

  • 1 C Powdered Sugar (Also known as Confectioners Sugar)
  • 2 Tbsp Water The water should be at room temperature.

Pesto and Sweet Onion Filling

  • 1 Small Vidalia Onion, Diced If you do not have access to a sweet, Vidalia onion, use a white onion.
  • 2 Tsp Garlic, finely chopped
  • 1/2 C Pesto If you are a pesto-lover, you can add up to 3/4 C.
  • 1 Tsp Lemon Juice
  • 1/4 Tsp Salt
  • 1/4 Tsp Red Pepper Flakes
  • 1 Tbsp Olive Oil
  • 1/2 C Parmesan Cheese, Grated (Optional)

Bacon Jam & Cheddar Filling

  • 1/2 C Bacon Jam Bacon Jam can be found in most Grocery Stores. If you cannot find Bacon Jam, cook 4 slices of bacon to a medium-crisp. Once cooked, toss with 1 Tbsp brown sugar and 1/8 tsp cayenne pepper.
  • 8 Oz Shredded Sharp Cheddar Cheese

Extras

  • 1/2 C Butter, Melted

Instructions

Make the Pinwheel Dough

  • Bloom the yeast: In a small bowl, combine the yeast, sugar (1 tsp), and warm water. Give it a gentle stir then let it sit until the yeast bubbles. You’ll start to smell it after about five minutes. Once it’s bubbly and fragrant, the mixture is ready for the next step.
  • Fit your stand mixer with the beater attachment (the one that looks like a whisk). Combine the butter, sugar (1 cup), salt, and hot water. Once combined turn off your mixer and let it cool off a bit.
  • Once your mixture is cooled slightly (warm, not hot), add in two cups of flour and combine until smooth.
  • Add in the bubbly and fragrant yeast mixture; combine at low speed.
  • Add the two large eggs to a bowl and beat until the yolks are broken and the whites are fully combined. Add the beaten eggs to the mixer; combine at low speed.
  • Remove the beater attachment from the mixer and swap it with the dough hook.
  • With your mixer on a low speed, add in the remaining flour 1/4 cup at a time allowing the dough hook to combine as you go.
    Once you get to 8 cups of flour total, take inventory of your dough. If it’s super sticky and not coming off the sides of the bowl, you’ll most likely need to go up to the full 10 cups. If the dough is a little less sticky and starts to come off the sides of your bowl, you'll most likely need 9 cups.
  • Once your flour is fully combined, allow the dough hook to knead your dough for 3 – 5 minutes. 
  • Flour a clean surface (a marble or granite countertop, a cutting board, etc. will work) and turn out your dough.
  • Knead the dough by hand until it’s very smooth. Don’t hesitate to sprinkle on some flour while you knead if the dough feels sticky or if your hands are getting a bunch of dough on them. This process will take 2 - 4 minutes.
  • Place the dough in a clean bowl, cover it tightly with plastic wrap, and place in a warm spot to rise. I typically put mine in my oven so it won’t get disturbed.  
  • Let the dough rise for one hour; it should double in size. This can take up to 90 minutes.

Cinnamon Sugar Filling

  • In a small mixing bowl, combine the cinnamon, brown sugar, granulated sugar, and salt.
  • Once fully combined, set approximately 1/4 of the mixture aside (you'll use this to top the pinwheels).

Pinwheel Icing (For Cinnamon Sugar Layered Pinwheel)

  • Combine the powdered sugar and water in a bowl, mix well using a whisk.
    There are no hard rules for this icing. If you feel it’s too loose, add a bit more powdered sugar, 1 Tbsp at a time. If it’s too thick, add a bit more water, ½ tsp at a time.
    The goal is to have an easily pourable icing so it gets into the nooks and crannies of your cinnamon sugar pinwheel.

Pesto and Sweet Onion Filling

  • Saute the onion and garlic in the olive oil; sprinkle with salt and pepper. Saute until the onion is translucent; this will take about five minutes.
  • While the onion is sauteing, combine the pesto, lemon juice, salt, pepper, red pepper flakes, and parmesan cheese (if using).
  • Once the onion and garlic mixture has cooled, add to the pesto mixture and mix well.

Bacon Jam & Cheddar Filling

  • Bring the Bacon Jam to room temperature. (If you’re preparing the bacon with the brown sugar and cayenne, make sure it is also room temperature.)
  • Pour the shredded cheddar cheese in a small bowl so it's easily accessible when you're ready to fill the pinwheels.

Form the Pinwheels

  • Melt the 1/2 cup butter in a microwave-safe dish stirring every 15 seconds until fully melted.
  • Once your dough has risen, turn it out onto a clean surface dusted with flour. Divide it into three parts. 
  • Roll 1/3 of your dough into an approximate 10 x 14 rectangle.
  • Using a basting brush or the back of a spoon, evenly spread 1/3 of the melted butter.
  • Select your filling and evenly spread across the entire surface of the dough, leaving about a 1/2 inch edge.
  • With the filling in place, roll the dough as tightly as possible all the way to the end creating a log.
  • Cut the dough into 8 pieces using a very sharp knife. You can achieve even Pinwheel sizes by first cutting the log in half, then cutting each half down the center, and so on until you have 8 pinwheels.
  • Place your cut Pinwheels into a 9 x 13 baking dish relatively close together, leaving about a 1/2 inch space between each Pinwheel. If your baking dish does not allow for a 1/2 inch spacing between each Pinwheel, it's ok. Try to achieve as much space as possible and if the Pinwheels touch sides, it will be ok.
    Do not mix pinwheel flavors in the same baking dish.
  • Preheat your oven to 375 degrees.
  • Let the Pinwheels rise for 30 minutes in the baking dish.

Bake the Pinwheels

  • For the Cinnamon Sugar Pinwheels, dust the top with the cinnamon sugar filling you reserved.
    For the Sweet Onion and Pesto Pinwheels, sprinkle the top with Salt and Pepper and the Parmesan cheese you reserved.
    For the Bacon Jam and Cheddar Pinwheels, sprinkle the top with Salt and Pepper.
  • Bake at 375 degrees for 30 - 35 minutes until golden brown.
  • Let the pinwheels cool and set in the baking dish for 5 minutes.
  • For the Cinnamon Sugar Pinwheels, top them with the icing.
  • Serve the pinwheels warm and enjoy.

Recipe Tips

For the baking dish, a 9 x 13 pan is ideal; however, if you do not have three 9 x 13 baking dishes, you and utilize multiple smaller baking dishes such as cake pans, pie plates, or other sized baking dishes. 
5 Ingredient Artisan Bread

5 Ingredient Artisan Bread

There is something so satisfying about making bread. It’s a process of love, it smells amazing, and is simply delicious. 5 Ingredient Artisan Bread is a tried and true recipe – one that I’ve made many, many times. This artisan bread is made with five Continue Reading